

Although the Canvas App empowered shop-floor staff to browse inventory, capture orders and assist customers at pop-up events, managers and administrators needed a complementary solution offering structured forms, guided processes and embedded analytics. The Model-Driven App delivers exactly that:
“a declarative, metadata-driven experience built on Microsoft Dataverse that emphasises robust data modelling, rich user interfaces and process automation all achieved with minimal custom code.”
By adopting a Model-Driven approach, Solestyles Boutique maintains complex relationships across Products, Orders, Customers, SpecialRequests and InventoryAdjustments tables, ensuring referential integrity and automatically deriving roll-up metrics.
Business Process Flows shepherd critical workflows whether approving supplier markdowns or onboarding new partners through multi-step, conditional stage-gates that enforce business rules at each juncture.
Role-based security configurations grant managers visibility over every order while assistants only see their own, thanks to table permissions and field-level security. At the same time, embedded dashboards surface essential KPIs, stock-turn rates, average order values and seasonal trends directly within the app, removing the need to switch to a separate BI portal.
In this post, I’ll guide you through building the Solestyles Model-Driven App from the ground up; defining tables and relationships in Dataverse, crafting custom forms and views, implementing business logic with rules and flows, and embedding rich dashboards that bring your data to life. Whether you’re an IT professional transitioning from spreadsheets or a business user looking to tame complexity with low-code tools, you’ll see how Model-Driven Apps can become the administrative backbone of your organisation. Let’s get started.
Rather than splinter multiple solutions across your environment, the optimal approach is to keep both your Canvas and Model-Driven apps in a single solution container – Solestyles Boutique (created in part 2). This single repository ensures consistent Application Lifecycle Management (ALM) practices, simplifies environment migrations and centralises governance.
Having a single solution container means that every component; Canvas App, Model-Driven App, Power Automate flows, and even Power Pages; travels together through development, test and production.
Because the app resides inside our main solution, it automatically inherits environment variables, connection references and versioning settings that were defined earlier for the Canvas App.
The sitemap defines the user navigation in your Model-Driven App:
Since you already added these when setting up the Canvas App, simply confirm:
No need for new variables or references unless introducing new integrations like Teams webhooks or custom connectors.
By centralising your components in one solution and reusing configuration artefacts, you streamline ALM, reduce duplication and position Solestyles Boutique for rapid future enhancements.
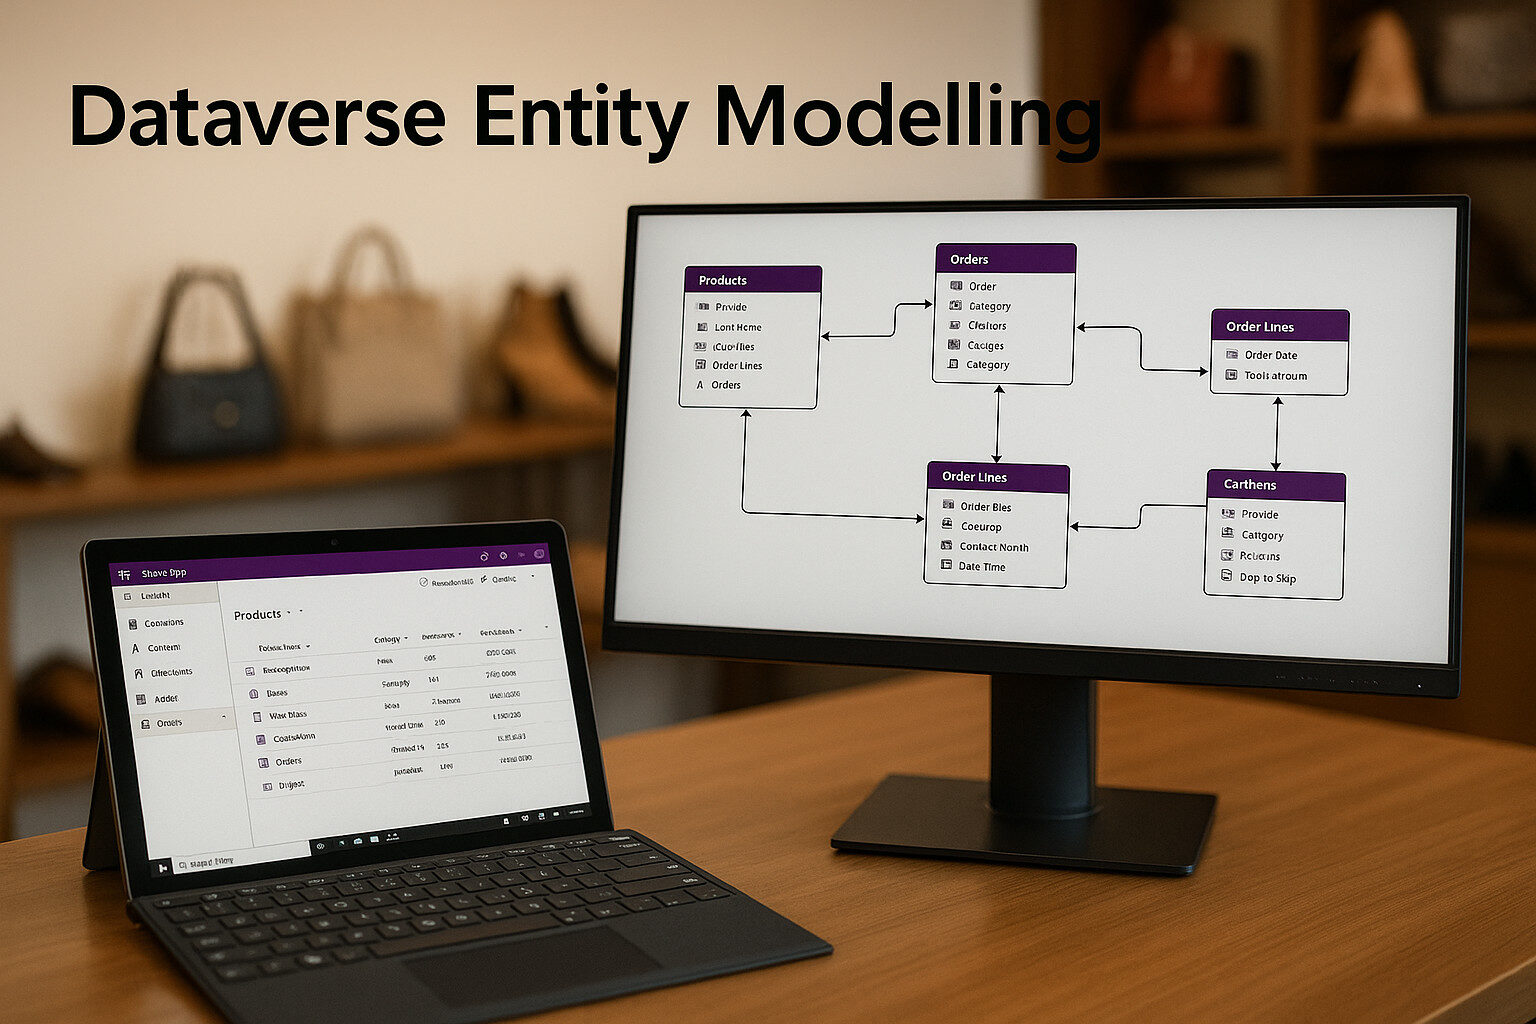 A solid data model is the foundation of every Model-Driven App, and for Solestyles Boutique I crafted an extensible schema in Microsoft Dataverse that accurately maps products, orders and customer entities along with their interdependencies. By defining dedicated tables for each core object, establishing lookup fields to enforce referential integrity, and implementing advanced Choice, Calculated and Roll-Up columns, I created a single source of truth that automatically derives and summarises vital business metrics. This design not only streamlines data capture and consistency but also delivers real-time insight into sales performance, order status and customer activity without the need for additional workflows.
Beginning by reviewing the five primary tables:
To maintain referential integrity across our Dataverse tables I defined precise lookups and leveraged the platform’s built-in relationship management.
In the Orders table, I added a lookup field called Customer (schema name crb_Customer) that points to the Contacts table. This ensures every order is explicitly tied to a contact record, making it trivial to fetch customer details without manual joins.
Moving to the OrderLines table, I created two additional lookup fields: one linking each line item back to its parent Order, and another referencing the Product it represents. As soon as these lookups are in place, Dataverse automatically provisions the corresponding N:1 and 1:N relationships. You can confirm these associations under each table’s Relationships tab where you’ll also see that, for example, the delete behaviour between Order and OrderLines is set to Cascade All, guaranteeing that removing an order record will cleanly remove its related line items.
I extended the data model by implementing three advanced column types; Choice, Calculated and Roll-Up; to deliver real-time insight without resorting to manual workflows.
Within the Products and Orders tables, I configured Choice columns to enforce data consistency. In the Products table, the Category column presents a fixed set of options – Trainers, Heels, Boots and Accessories -ensuring that every product record aligns with one of these four categories. Likewise, the Orders table uses a Status column defined with the values Draft, Submitted, Shipped, Completed and Cancelled, so that the order lifecycle is clearly visible and strictly governed.
For on-the-fly computations, the OrderLines table includes a Calculated column called LineTotal. This field multiplies Quantity by Price directly in the table’s Add Column → Calculated designer, eliminating the need for external scripts or Power Automate flows to derive line-item subtotals.
Finally, at the parent-record level, I introduced Roll-Up columns to aggregate related data automatically. On the Products table, TotalSales sums all OrderLines.LineTotal values where the lookup matches the current product record; on the Contacts table, TotalOrders counts each Order associated with the contact. Both roll-ups are defined via Add Column → Rollup, with aggregation rules (Sum for TotalSales, Count for TotalOrders) that ensure metrics update instantly whenever related records change.
Together, these Choice, Calculated and Roll-Up columns provide a robust, self-maintaining framework streamlining data capture, enforcing consistency and delivering up-to-date business metrics without manual intervention.
By carefully constructing your Dataverse model with lookups, choice fields and aggregated columns, you lay the groundwork for a Model-Driven App that both mirrors Solestyles real-world processes and provides the foundation for business rules, forms and dashboards. Next, I turn these entities into user-facing forms and views.
 A Model-Driven App shines when its forms and views are tailored to user roles and daily tasks. Solestyles administrators need rich, structured forms for orders and inventory, curated views to focus on pending work, and Quick Create forms that speed up common record entries. Here’s how I built each:
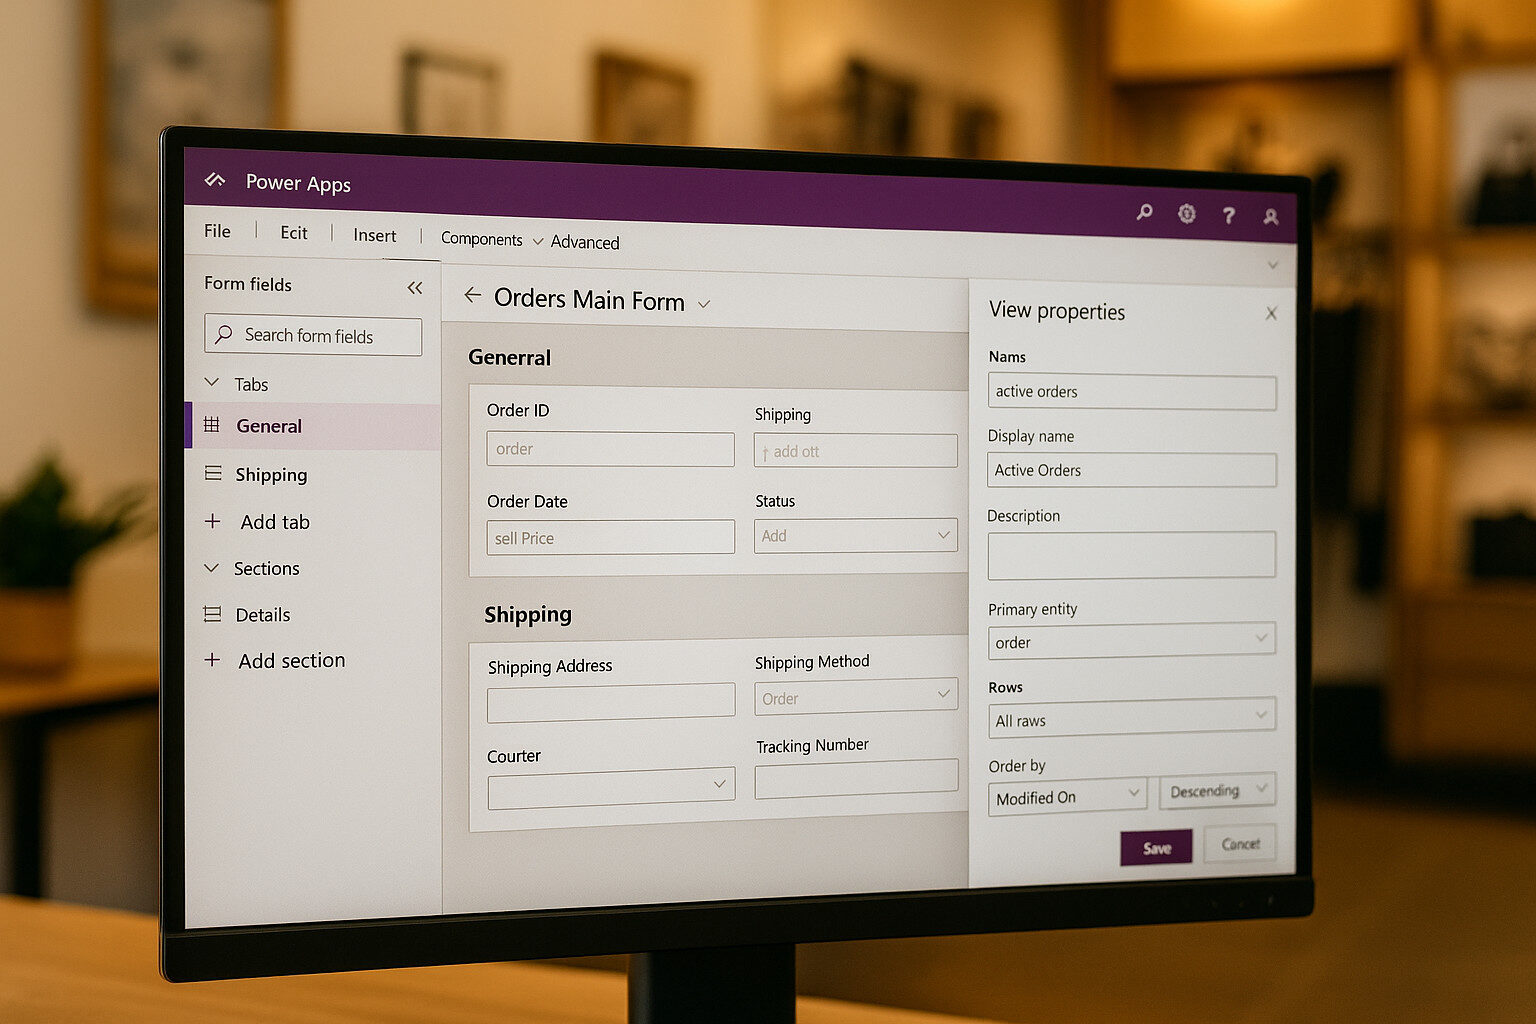
Forms in Model-Driven define how users view and edit records. For the Orders table I used the following design aspects:
I organised the order form using two primary tabs – General and Shipping – to mirror the natural progression of user tasks. Under the General tab, the Order Details section captures the core transaction data: Order Number, Order Date and Status. Placing these fields together ensures users can verify the most critical identifiers before entering any additional information.
Adjacent to this, the Customer Info section holds the Customer lookup and Contact Phone fields, enabling quick access to the buyer’s details without navigating away from the form.
Switching to the Shipping tab, I defined a Shipping Address section that groups all address-related fields; Street, City, Postcode and Country; to maintain a coherent block for logistics data entry. Below that, the Carrier Details section houses Shipping Method and Tracking Number, keeping all shipment-specific attributes in one place.
By delineating tabs and sections this way, it helped guide users through a clear, step-by-step interface that aligns with real-world order workflows and minimises cognitive load.
To maximise form usability, I adopted a drag-and-drop placement approach focused on context and visibility. The Order Number and Order Date fields occupy the top row of the General tab, offering instant context as soon as the form loads. This placement helps users confirm they are working on the correct order before making any edits.
The Status field is positioned on the right-hand side, directly beneath a coloured banner connected to the Business Process Flow stage. This visual cue ties the status to the broader approval process, making it immediately obvious which stage the order is in. Meanwhile, on the Shipping tab, I grouped the address fields (Street, City, Postcode) in a single logical block to streamline data entry.
This consistent grouping reduces errors by keeping related inputs together and follows form-design best practices for clarity and efficiency.
To surface key metrics without scrolling, I added two dynamic fields to the form header. The Total Sales roll-up appears prominently at the top, giving users an at-a-glance view of revenue generated by the order’s line items. Placing this KPI in the header ensures it’s always visible, regardless of which tab the user navigates to.
I also moved the Order Status into the header, reinforcing consistency across all form views. By elevating these critical elements to the header, it reduced the need for users to hunt for performance indicators and process stages, thereby speeding up decision-making and improving overall user satisfaction.
Once the layout and field configurations were finalised, I Saved and then Published to deploy the new form instantly. This ensures that every user sees the updated design without delay; there is no need for manual updates or additional approvals. Throughout the design process, I adhered to several best practices:
These practices collectively deliver an intuitive, performant form that scales with user needs and supports accurate data capture.
In Microsoft Dataverse, views define both the scope of records users can retrieve and the columns they see, so I tailored three distinct views on the Orders table to match different user needs:
For scenarios that demand rapid data entry such as logging manual inventory adjustments whilst on the shop floor; I enabled and configured a Quick Create form in Microsoft Dataverse to streamline the process.
By turning on the Quick Create feature for the InventoryAdjustments table, a simple click on the “+” icon in the sitemap launches a pop-up dialog rather than loading a full form page, significantly reducing navigation time and cognitive overhead.
In the Quick Create Form designer, I focused on showing only the essential fields. The form included:
Omitting non-critical fields keeps the form concise, guiding users to enter just the information required to commit a valid record with minimal distraction.
Once the form layout was finalised, I saved and published directly from the maker portal. The form was immediately available to all roles with access to inventory adjustments. Users can trigger the form from any page in the app, enter their data in a lightweight overlay and hit “Save” to persist the record instantly – no draft states, no extra clicks. This approach delivers three core benefits:
By designing and building the main forms, developing tailored views and now enabling Quick Create for swift adjustments, the Solestyles Boutique team can manage orders, monitor inventory and capture changes entirely within the Model-Driven App. Next, I introduced Business Rules and Business Process Flows to automate field validation and guide users through more complex tasks, elevating both data quality and user productivity.
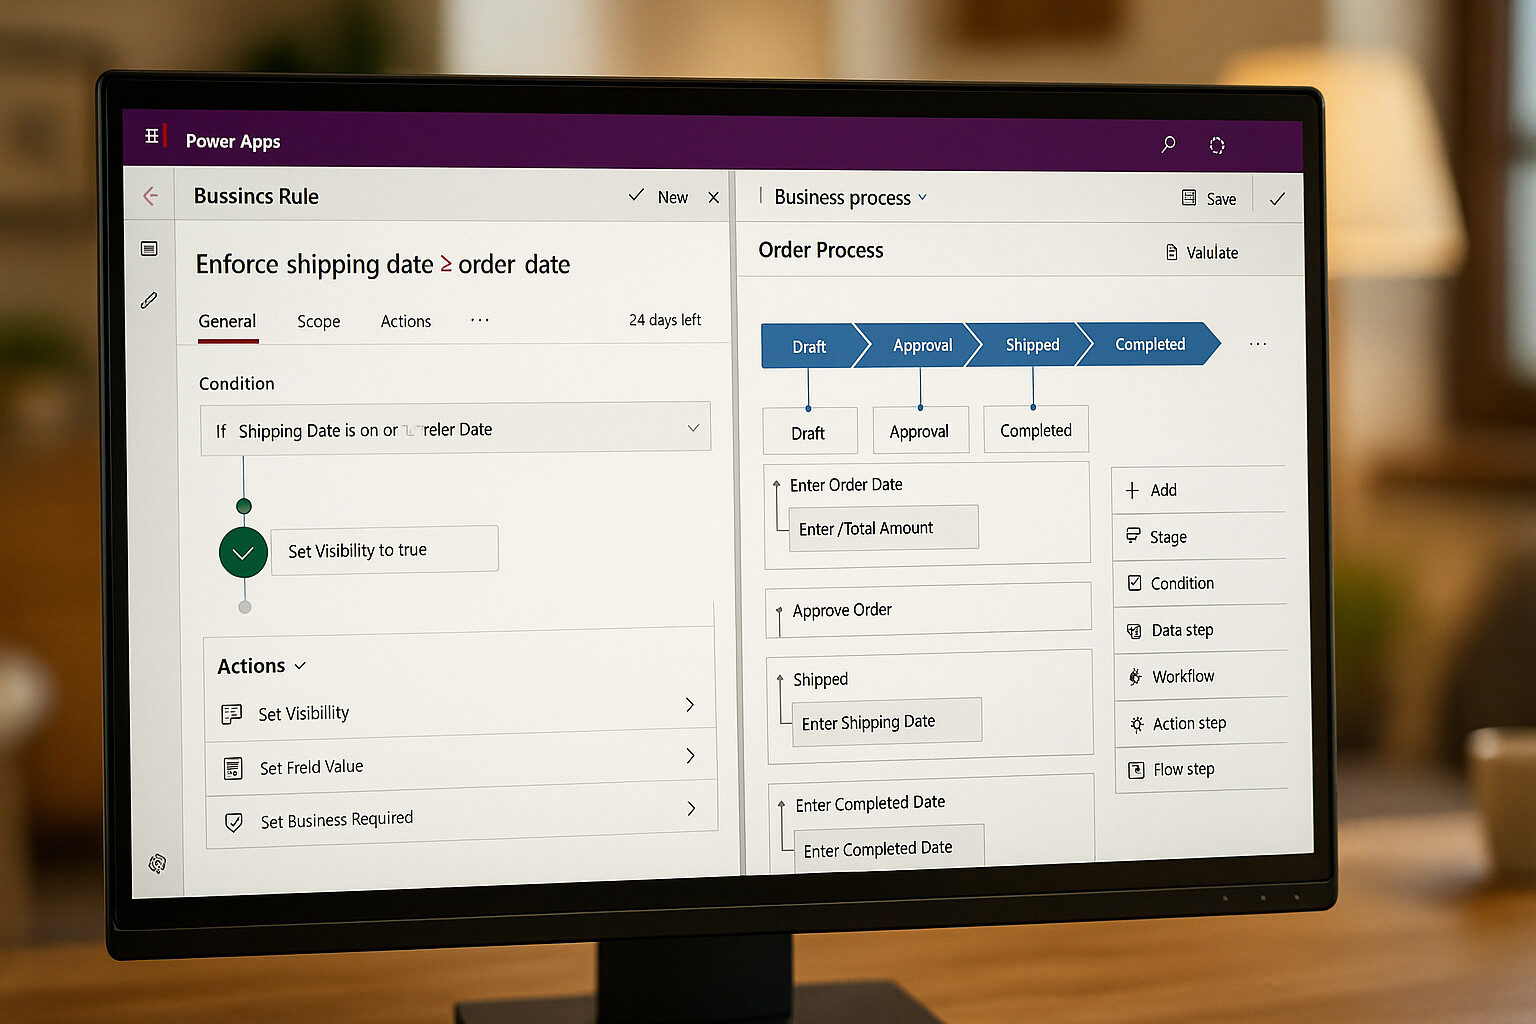 Model-Driven Apps deliver a structured, rule-driven interface that both safeguards data quality and embeds automation within the user journey. In the Solestyles Boutique solution, I defined Dataverse Business Rules to enforce real-time field validation ensuring mandatory entries, data-type constraints and value thresholds are applied at the form layer, and architected a Business Process Flow to orchestrate the order lifecycle and markdown approvals. Each stage of the BPF from order drafting and managerial sign-off through inventory check to final price-adjustment authorisation is gated by explicit conditions, preventing progression until all business criteria are met. Here’s how:
Harnessing Dataverse Business Rules, I added real-time validation and decision logic directly into the Orders table – no custom code required. By configuring these type of rules, form fields respond instantly to user input, enforcing mandatory entries, validating data types and applying conditional constraints as soon as a value changes.
In the Solestyles Boutique application, I created a suite of Business Rules on the Orders entity to guarantee data integrity at the point of entry. Whether it’s ensuring that a delivery date never precedes the order date or flagging unusually large order totals for review, these rules run behind the scenes to keep your data clean and compliant without any reliance on Power Automate flows. Here are two of the rules implemented.
This immediate feedback prevents managers or assistants from saving illogical dates and ensures data quality at entry.
Users see the updated total instantly, without waiting for a background workflow.
In the Solestyles Boutique solution, I built an Order Fulfilment Flow BPF to guide each order through its lifecycle in Dataverse. Starting in the Draft stage, users must record the Order Date and add all Order Lines before advancing.
Once the initial details are in place, the flow transitions to an Approval stage, where a manager responds via a two-state “Approved/Rejected” step. If the order is rejected, the conditional logic automatically routes it back to Draft for revision; if approved, it proceeds to the Shipping stage. Here, staff enter the Shipping Date alongside Carrier and Tracking Number information.
Finally, the Completed stage requires the Completion Date to be entered and the order formally closed. After designing and activating the stages and steps in the Power Apps maker (Processes → New → Business Process Flow), the flow was live for all users.
This BPF delivers a clear, visual roadmap embedded directly in the order form; users always know which stage they’re in, cannot skip required steps (so shipping cannot occur before approval) and benefit from conditional branches that elegantly handle rework. By enforcing sequence and embedding decision points:
For reference, here is the logic behind the BPF created:
To extend the Business Process Flow with an external notification, I inserted a Flow step immediately after the Approval stage. In that step, I selected the SpecialOrderNotificationFlow, which once an order is approved automatically dispatches a Teams alert to the buying team, ensuring they’re immediately informed.
This hybrid design marries the simplicity of low-code Business Process Flows with the full power of Power Automate. It lets you guide users through on-form stages while seamlessly invoking complex, cross-system workflows delivering the best of both worlds in a single, cohesive solution.
By embedding Business Rules and Processes, Solestyles’ Model-Driven App not only captures data, but also ensures that every order follows the correct path from creation through approval, shipping and completion empowering administrators with guided, error-free workflows.
 Administrators need more than just lists and forms, they require insights at a glance. In this section, I explore how to add native charts, assemble dashboards and embed Power BI reports within your Model-Driven App, ensuring Solestyles leadership can monitor key metrics and make data-driven decisions without leaving the portal.
Dataverse offers built-in charting capabilities that can be surfaced directly on entity forms and dashboards:
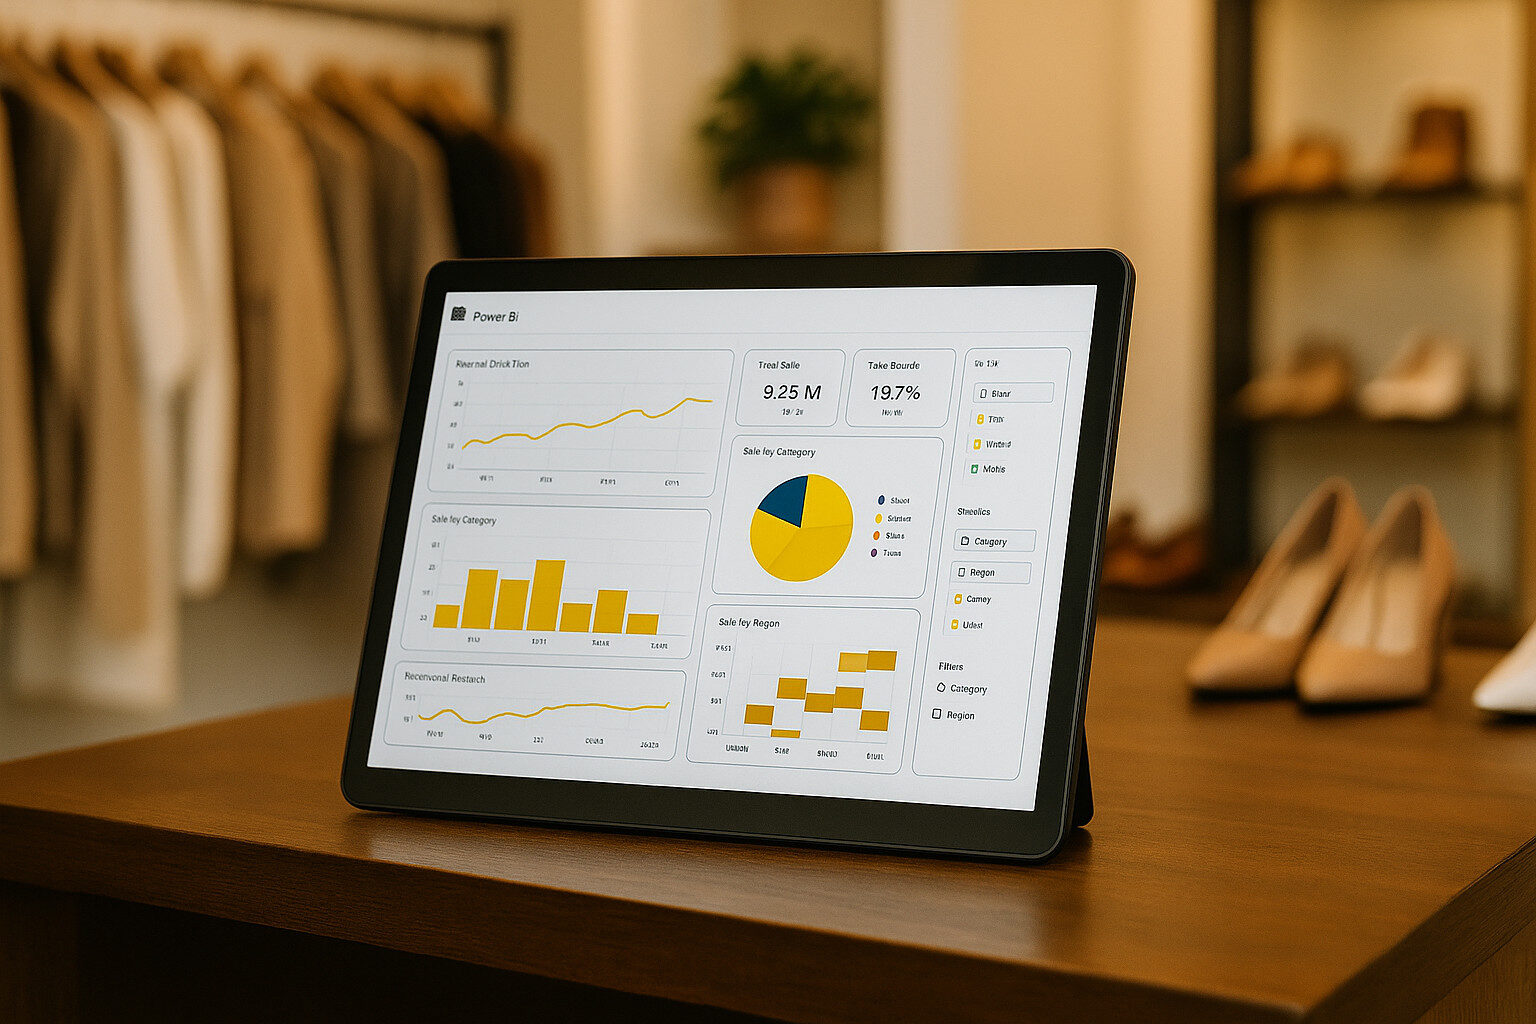
Within the Power Apps maker portal, I used the Dashboard designer to craft a consolidated workspace for key metrics. First, I chose New Dashboard and selected a two-column grid layout that balances visual density with readability. This layout ensures that charts and lists sit side-by-side, giving managers and assistants alike a single pane of glass into operational performance.
Next, I populated the canvas with a mix of dynamic and static elements. On the left column, I added a sales-performance chart drawn from the Orders table to track total revenue trends; alongside it, a product-sales chart highlights bestsellers. In the right column, I embedded the “My Pending Orders” view so each user sees their actionable items at a glance, and included a resource to show the internal process documentation. After fine-tuning component sizes and labels, the dashboard was published allowing users to pin the dashboard as their home page for immediate, role-specific insights every time they log in.
In Power BI Desktop, I connected directly to the Solestyles Dataverse environment via the OData feed and crafted interactive reports combining line charts, matrix tables and geographic maps to surface both live and historical insights. Once the visuals were complete, I published the report to the Power BI service and copied its secure embed link for integration.
Accessing the Model-Driven App designer, I opened the relevant form or dashboard, added a Power BI report component and pasted in the link, choosing either Report or Dashboard mode to suit the user experience.
Finally, I confirmed that everyone who needs access holds a Power BI Pro licence or that the report resides within a Premium capacity workspace. By embedding Power BI directly into the Model-Driven interface, Solestyles managers can drill into data, apply filters and interact with rich analytics without ever leaving the app’s context.
I compared DirectQuery and Import modes to align data access with business needs. DirectQuery maintains a live connection to Dataverse, ensuring that dashboards and reports always reflect the latest transactional updates ideal for monitoring inventory levels or current order statuses. However, because each user interaction generates real-time queries against the source, complex filters and large datasets can introduce latency.
For extensive historical analysis such as multi-year sales trends or seasonal performance, I import data into Power BI’s in-memory engine. This Import mode delivers high-speed interactivity, but to prevent unwieldy model sizes, I configured Incremental Refresh. By partitioning tables on date fields, refreshing only the most recent time window and archiving older snapshots, a balance between comprehensive history and efficient nightly updates is maintained.
To further accelerate the user experience, I enabled Dataverse dashboard caching. This stores pre-rendered visuals and metadata for frequently accessed charts, slashing initial load times without sacrificing data accuracy. When real-time freshness isn’t critical, cached components deliver near-instant feedback.
By combining native Dataverse charts, tailored dashboards and embedded Power BI, each tuned with the appropriate connectivity mode, refresh strategy and caching, Solestyles Boutique leadership are provided with a unified analytical workspace. Every KPI, trend and alert appears in one consolidated portal, optimised for both immediacy and performance.
Securing Solestyles data in Dataverse means carefully configuring who can see, create, update and delete records, protecting sensitive fields and even controlling who can open the Model-Driven App itself. In this section, I cover environment-level roles, table privileges, field-level security and app-level permissions.
To safeguard Solestyles Boutique’s Dataverse environment, start by signing into the Power Platform Admin Centre (https://admin.powerplatform.microsoft.com) and selecting the Solestyles Boutique environment.
Under Settings → Users + Permissions → Security roles, you can assign each team member a predefined or custom role. Basic Users receive read/write access on common tables but minimal customisation rights, System Customisers can tailor the solution’s metadata without automatic access to all business data, and System Administrators hold full privileges across data, security and customisation. Assigning users (or teams) to these roles via the Manage Roles dialogue ensures that everyone has the correct environment-wide permissions from day one.
Within each security role, you can define granular privileges for every table – Create, Read, Write and Delete – cover core operations, while Append and Append To govern parent–child relationships, and Assign and Share determines record ownership and sharing behaviour. These privileges can be scoped to the user’s own records, their business unit, a parent-child business-unit hierarchy or the entire organisation.
“For example, a Shop Assistant might have user-level read/write on the Products table but only read access to Orders, whereas a Sales Manager enjoys organisation-level read/write on both Orders and OrderLines.”
This model grants precise control over who can modify which tables and at what scope.
Certain columns such as payment tokens or credit limits demand extra protection. By enabling field-level security on a column in the table designer, and then creating a Field Security Profile (under Users + Permissions → Field Security Profiles) named for its purpose (for instance, “CustomerSensitiveData”), you can restrict Read, Update and Create permissions on a per-field basis.
Adding the appropriate users or teams to that profile and publishing it ensures that anyone outside the profile sees those fields redacted across forms and views, keeping sensitive data hidden even if they can access the record.
Even after configuring table and field security, users must also be granted the right to open the Model-Driven App itself. In the App Designer, navigate to Settings → Roles to specify which security roles are allowed to see and launch the app. Only individuals assigned at least one of these roles; such as a Sales Manager or Shop Assistant; will find the Solestyles Boutique app in their Power Apps home screen, preventing unauthorised access at the entry point.
For more granular data partitioning, Business Units establish a hierarchical structure (for example, Head Office and North Region) that limits data visibility to users within each unit. To facilitate collaboration across those boundaries without elevating individual privileges, Owner Teams and Access Teams can be configured allowing groups of users to share record ownership or access rights without altering their base security roles.
By combining environment-level roles, table-level privileges, field-level security profiles, app-level role assignments and Business Unit/Team structures, Solestyles Boutique enforces a strict principle of least privilege. Each user is empowered with exactly the data and functionality required for their responsibilities and nothing more. This “framework” of considerations is applicable to so many other Microsoft 365 applications and usage scenarios – Security, Compliance and Roll-based Access control is a necessity in todays cloud based world.
 Solestyles end-to-end platform isn’t complete without seamless links between Canvas, Model-Driven, Power Automate and external portals. In this section, I’ll embed a Canvas App inside our Model-Driven forms, add command-bar buttons to trigger Power Automate flows, and expose key tables via a Power Pages portal all while honouring the latest Power Platform features and security best practices.
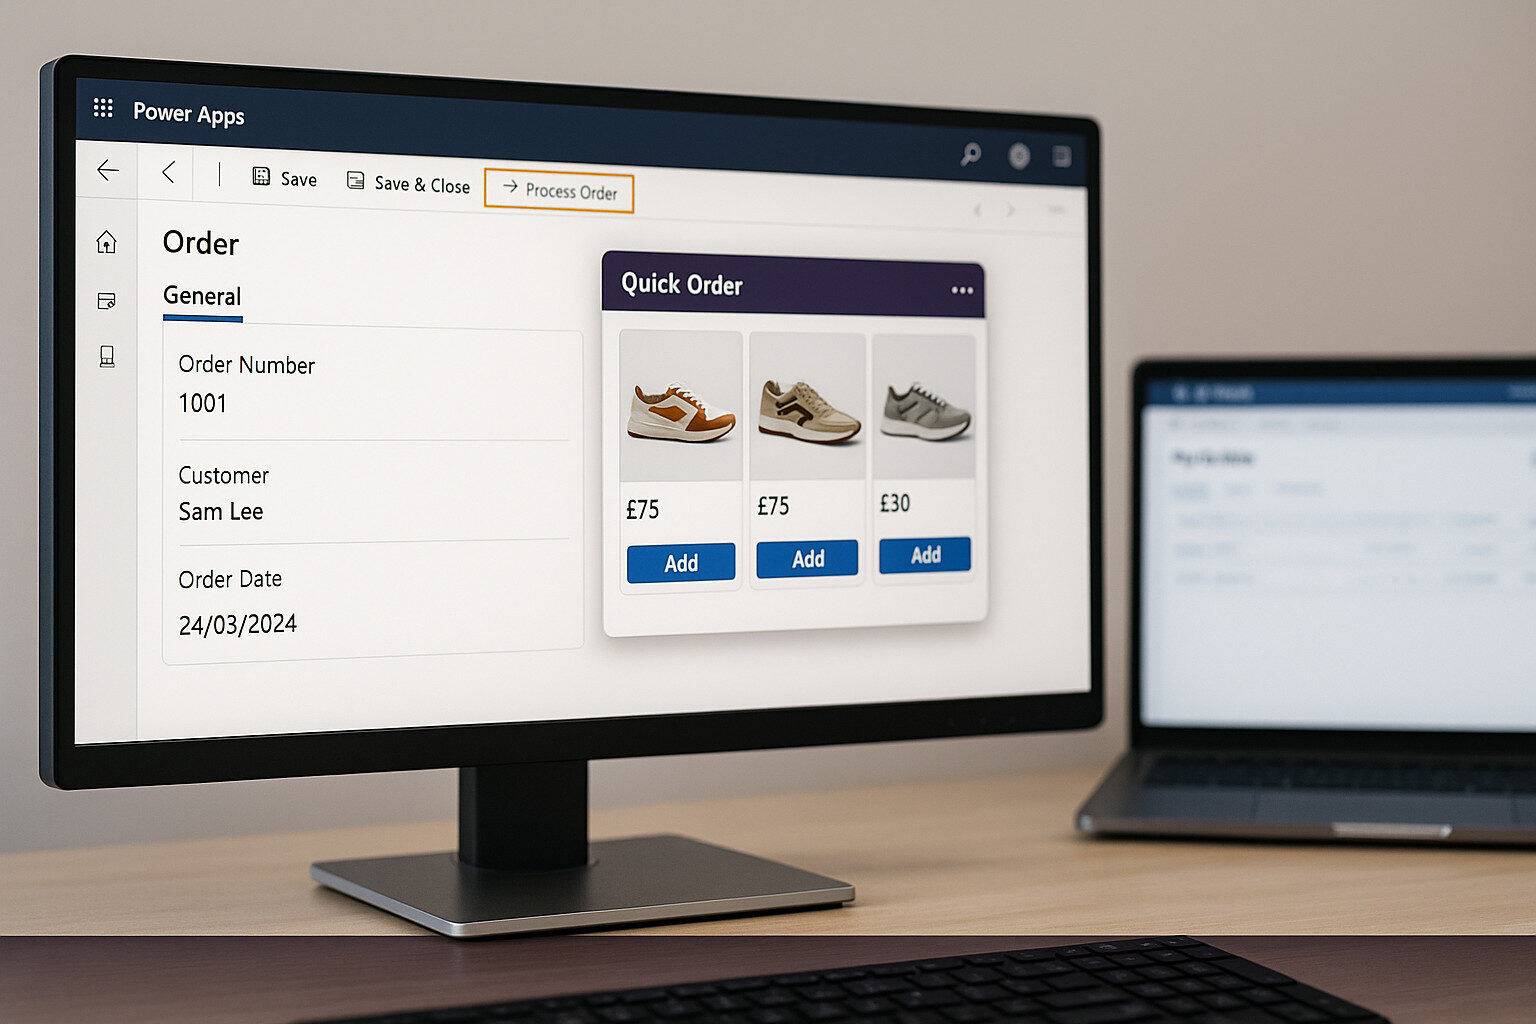
Embedding a Canvas App lets you surface rich, mobile-style experiences directly inside your Model-Driven forms, ideal for custom visualisations or mini-apps (e.g. a “Quick Order” picker):
Rather than switch to Power Automate to run flows, empower users with ribbon buttons right in the Model-Driven interface:
OrderID: formContext.data.entity.getId()By integrating Power Pages into a power platform solution, you can enable external customers to self-service; submitting new orders or checking status; without ever entering the internal Model-Driven App.
First, I investigated adding an existing portal to a solution: in the Power Apps maker under Solutions, chose Add → Existing → Portal and select the necessary existing site (yes you will need to have created the Power Page site already). This embeds all portal components in our managed solution, ensuring consistent ALM across environments.
Next, in the Power Pages Management app, define row-level security via Table Permissions. Create a permission record for the (example) Orders table, scoped to the authenticated Contact, and granted Read (and Create, where appropriate) rights. By tying permissions to the Contact lookup on each Order, the portal automatically filters records so each user sees only their own.
To surface order data, build a customer-facing page called (example) “My Orders”. On that page, an Entity List may present the “My Pending Orders” (oer similar) view from Dataverse, and an Entity Form displays the Order Details form when a user selects an order. This combination gives customers a familiar list-and-detail experience directly within the Power Pages site.
Finally, link the Authenticated Users web role to a new table permission record. With this role assignment and Power Pages’ built-in authentication, theming and security, signed-in customers can register or log in, view their personal orders and even submit new requests, all without compromising the security or integrity of the internal Model-Driven environment.
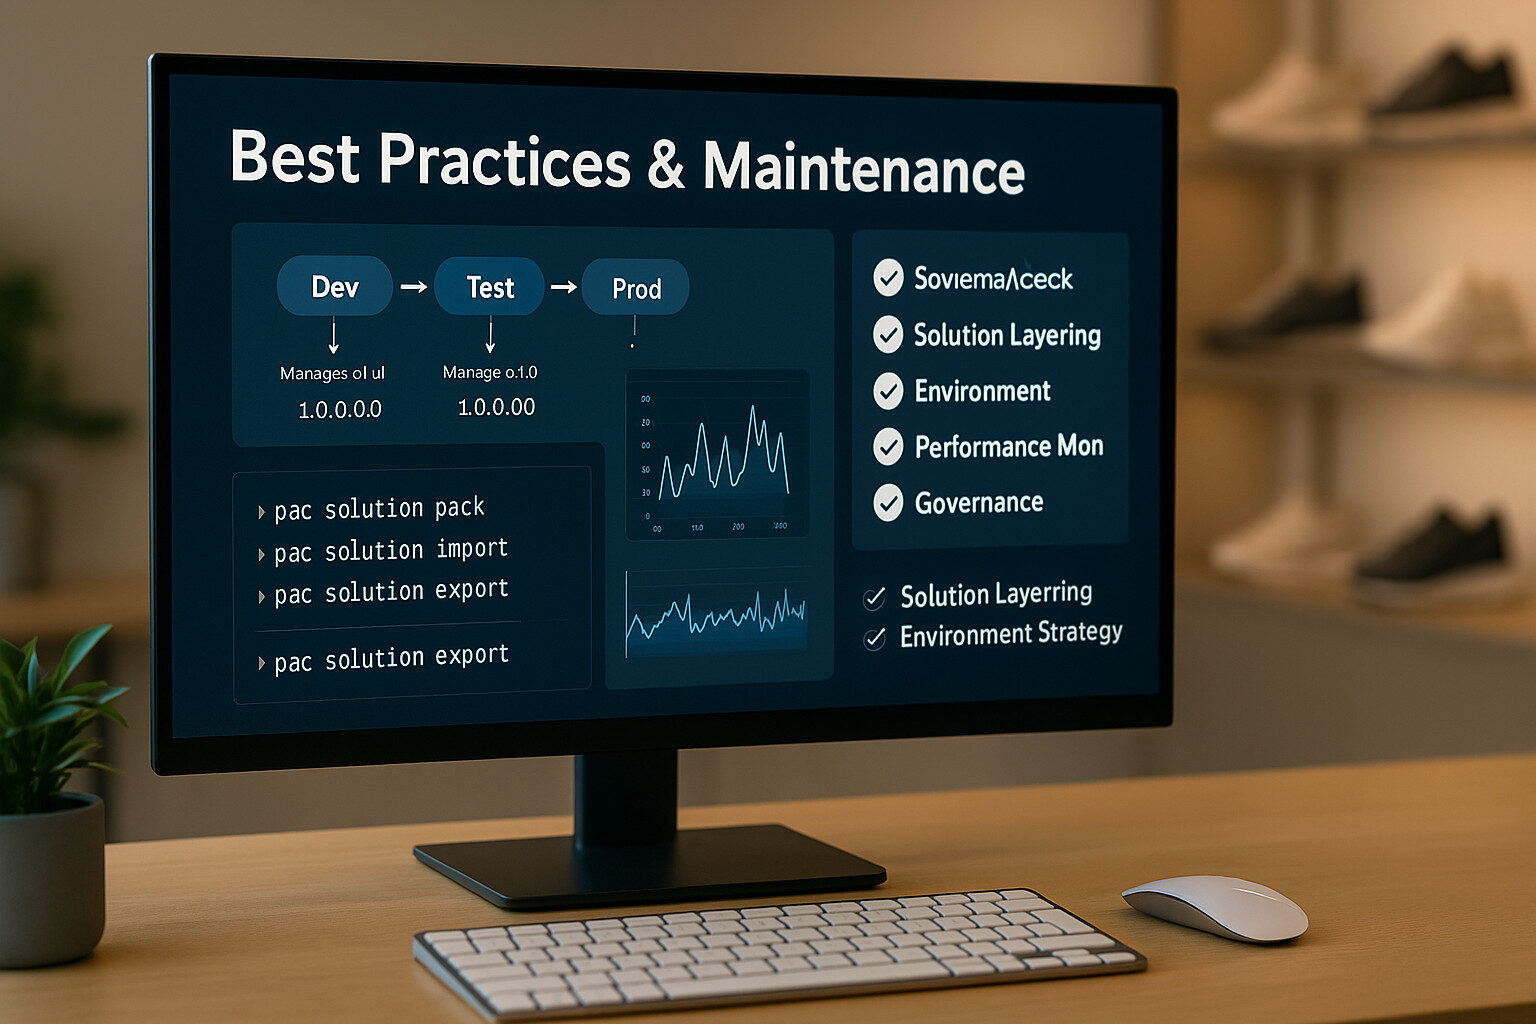 A robust Model-Driven App is not a “set and forget” exercise; it demands ongoing care to remain secure, performant and aligned with evolving business needs. In this final section, I cover solution layering, ALM strategies, performance tuning and governance practices that keep Solestyles Model-Driven portal in peak condition.
Keep customisations organised by using solution layering rather than unmanaged tweaks in production:
Tip: Automate your build-and-deploy pipeline using Azure DevOps or GitHub Actions with the Power Platform CLI (pac solution pack, pac solution import).
Even well-designed apps can degrade over time as data volume grows:
Maintaining control over changes and ensuring quality requires disciplined processes:
By embracing these best practices; layered solutions, vigilant performance tuning, and rigorous governance; you ensure that Solestyles Boutique’s Model-Driven App continues to deliver value, stays secure and adapts gracefully as the business scales. With this final piece in place, you have the blueprint for an end-to-end, enterprise-grade Power Platform solution.
 As I wrap up our exploration of Solestyles Boutique’s Model-Driven App, it’s worth reflecting on the journey taken. From laying a single, solution-aware foundation through meticulous Dataverse modelling, rich form and view design, logic-driven Business Rules and Process Flows, to embedded analytics and rigorous governance, each piece contributes to a cohesive back-office toolkit.
With the Model-Driven App standing tall as Solestyles administrative backbone, our next frontier is Power Automate. In Post 4, I’ll dive into:
By the end of Post 4, you’ll understand how to automate Solestyles end-to-end processes; from payment to order fulfilment; using enterprise-grade flows that complement our Canvas and Model-Driven experiences.
Thank you for joining me on this deep dive into Model-Driven Apps. If you have any questions or want to share your own best practices, please drop a comment below. See you in the next post!