

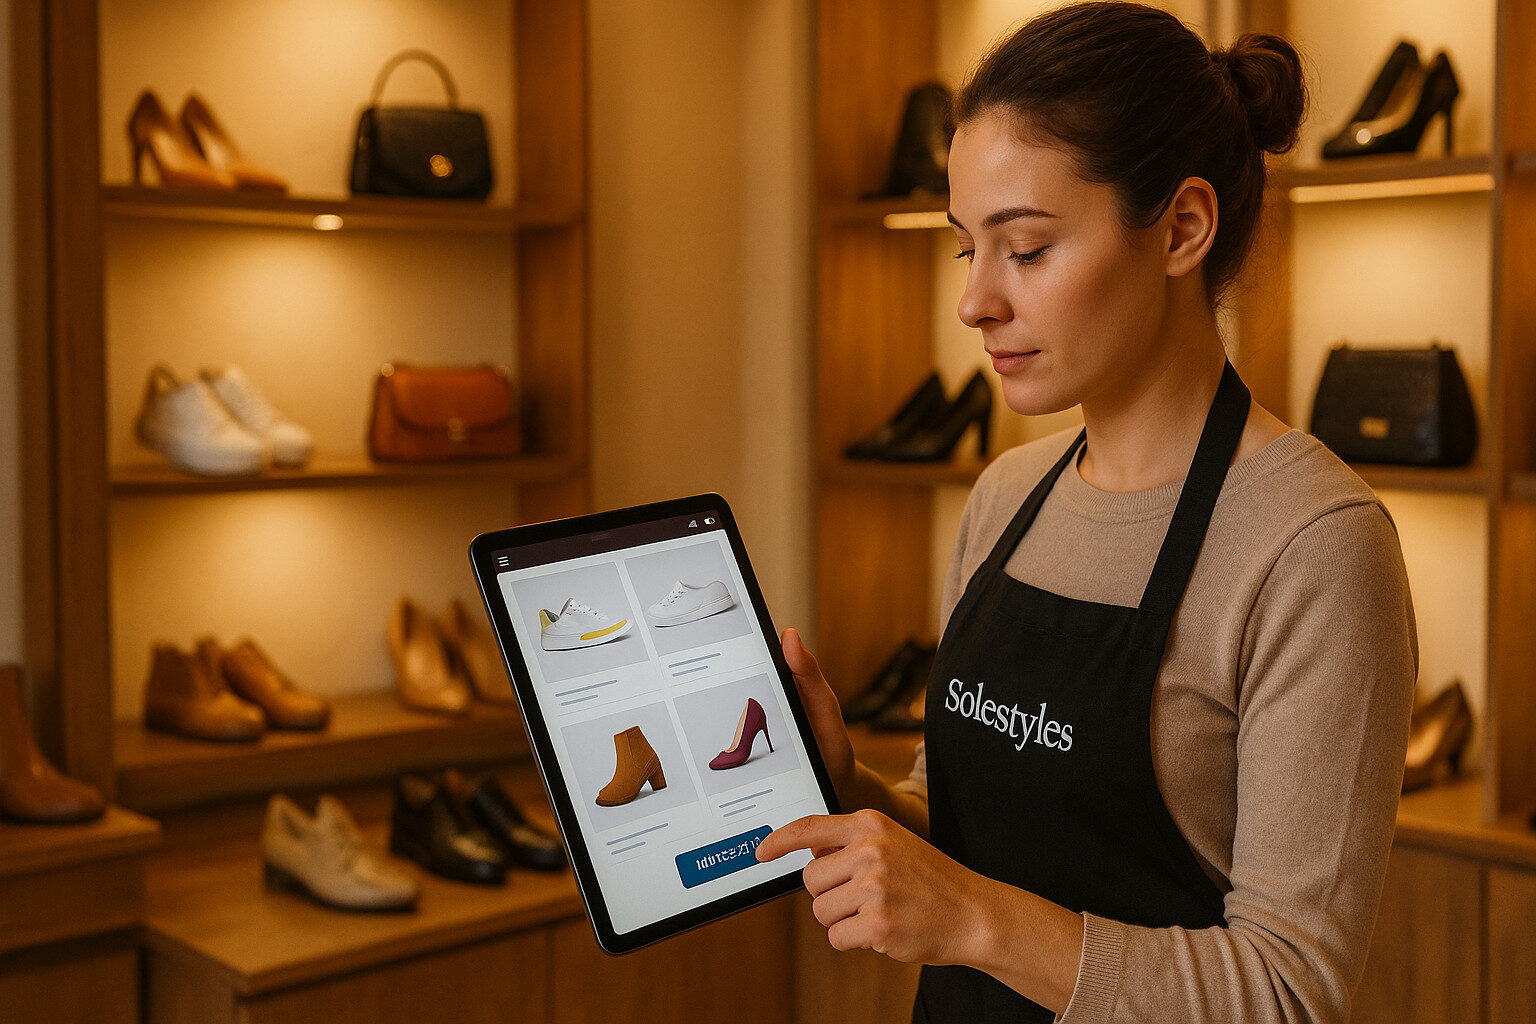
When you step onto the shop floor at Solestyles Boutique, the first thing you notice is the ease with which our team can now check stock, launch special orders and capture customer requests, all from the same tablet they once used to scan barcodes in fringe-signal car parks. This transformation stems from one pivotal component of the Power Platform solution; the Canvas App. In this second part of the Solestyles blog series, I’ll explore how I crafted a truly mobile-first experience, optimised for speed, simplicity and real-world unpredictability.
In the previous post, you saw how tedious paper invoices and chaotic spreadsheets hampered everyday operations and drove our small West Yorkshire boutique to seek a unified, low-code backbone. Now it’s time to talk about the frontline interface.
Why choose a Canvas App over other options?
What design decisions would allow our shop assistants juggling deliveries, pop-ups and in store customers to navigate thousands of SKUs without a single spin of the wheel?
Over the next few sections, I’ll trace the Canvas App’s evolution from its first rough wireframes through to a polished, delegable search screen. You’ll learn how I linked directly to Dataverse and SharePoint Online, organised data into collections for lightning-fast lookups, and engineered the navigation so that any required screen lies just one tap away. Along the way, I’ll share the formulas and patterns (anonymised); like multi-field delegable filtering and offline sync queues that turned a simple gallery into a robust, resilient tool, capable of handling everything from a rogue power cut to a deluge of weekend footfall.
Whether you’re already designing your own Canvas App or simply curious about how low-code can revolutionise the customer facing edge of your business, this journey through Solestyles tablet interface should spark ideas and give you practical technical ideas to borrow. So grab your iPad, find a quiet corner of your boutique and let’s dive into the next section, where I’ll set up those crucial data connections and lay the foundations for every screen to come.

Before a single control goes on canvas, it’s vital to establish a robust, solution aware foundation. By creating a proper solution and app record and by embedding environment variables and connection references; this ensures that your Canvas App is portable across environments, secure by design and easy to maintain.
By packaging everything in one solution, deployments become a matter of exporting and importing a single ZIP file, rather than reconnecting each component manually.
Because the app is created inside the solution, all subsequent links to environment variables and connection references remain intact across environments.
Rather than embed connection details in individual screens, store them centrally:
Rename them for clarity (e.g. CR_Dataverse, CR_SP, CR_Payment).
These references allow your Canvas App to add data sources without hard-coding credentials, streamlining both development and deployments.
By investing time upfront to structure your solution and by embedding key settings in environment variables and connection references, you set the stage for a stable, secure and scalable Canvas App that can grow with Solestyles Boutique.
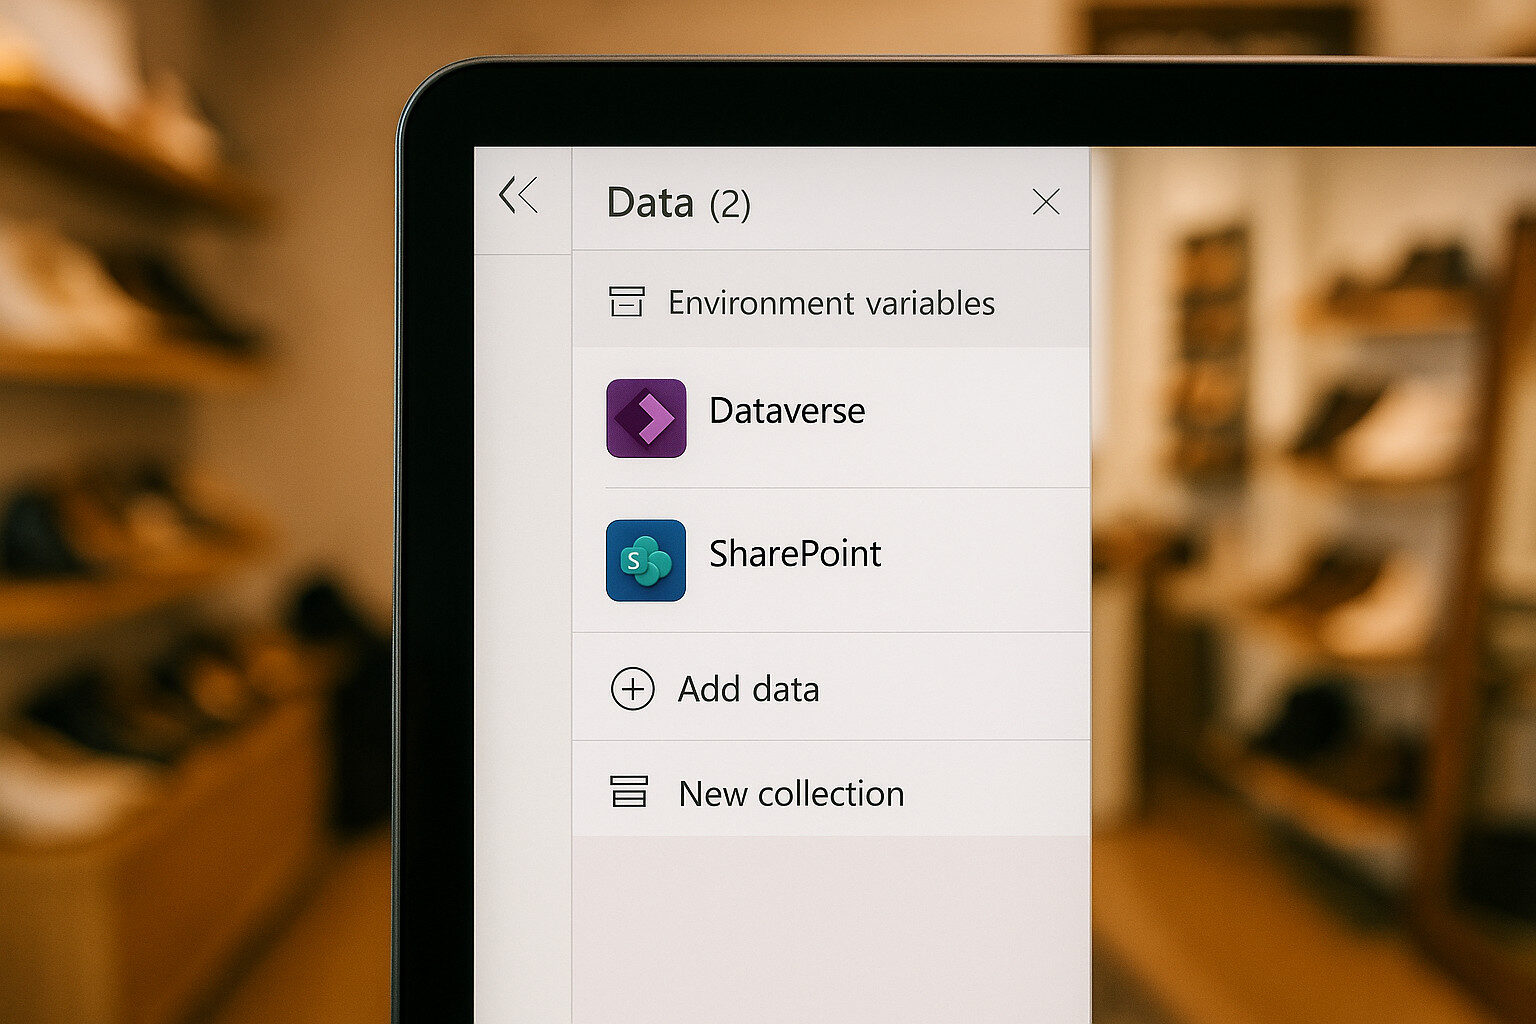 The cornerstone of the Canvas App is its seamless access to Solestyles core data:
alongside legacy inventory logs stored in SharePoint. Rather than hard-code connection details into each screen, I embraced solution-aware connections and environment variables to ensure consistency across development, test and production environments.
At the heart of this approach lies the Data pane in Power Apps Studio. Within the Solestyles solution, I first created two environment variables:
These variables live in the Solution but outside of the Canvas App, allowing us to migrate the entire solution package without manual reconnects. In the Canvas App’s Data pane, I then added two Connection references, each bound to its respective environment variable. Once configured, the app draws on these references for every data operation, greatly reducing drift between environments and ensuring consistent security settings.
While direct LookUp and Filter calls to Dataverse and SharePoint are perfectly serviceable, they can incur latency; especially when scanning large product tables over mobile broadband. To mitigate this, Solestyles Canvas App uses a two-tiered strategy:
On app launch, essential, static tables such as product categories and supplier lists via a single ClearCollect call is obtained:
ClearCollect(
colCategories, DataverseTable.Run(DataverseURL & "/api/data/v9.1/productcategories")
);
By storing these small datasets in the local colCategories collection, screens deeper in the app can reference them instantly, without round-trips to the server.
For large tables like Products or Orders, the app relies on delegable functions (Filter, Sort, Search) that off-load the work to Dataverse. This way, the server returns only matching records rather than the entire table:
Filter(
Products,
StartsWith(Name, txtSearch.Text)
);
Where legacy SharePoint lists remain useful for example, tracking ad-hoc inventory adjustments; I added a SharePoint connector using the same environment-variable pattern. However, I limit queries to sub-500-row batches (using Top and Skip) or load them into temporary collections for offline edits, avoiding delegation errors and throttling.
 Securing data at the source is non-negotiable for any retail operation. By using connection references with OAuth authentication, Dataverse honour’s the user’s identity and privileges:
If a shop assistant lacks permission to view wholesale order tables, the Canvas App won’t surface them.
I further scoped Dataverse table permissions in the Model-Driven environment, ensuring the Canvas connector cannot over-reach.
To sharpen performance:
This careful orchestration of environment variables, connection references and local caching means the Solestyles Canvas App reliably pulls its data from Dataverse and SharePoint no matter whether the user is on the shop floor’s Wi-Fi or an unpredictable mobile network.
When someone picks up the Solestyles Canvas App, they should never wonder where to tap next. I designed a streamlined five-icon header; Home, Search, Cart, Account and Plus (for staff-only actions) to keep every key function within a thumb’s reach. This custom navigation bar replaces the clutter of slide-out menus and ensures that users can move effortlessly from browsing to buying in just a few taps.
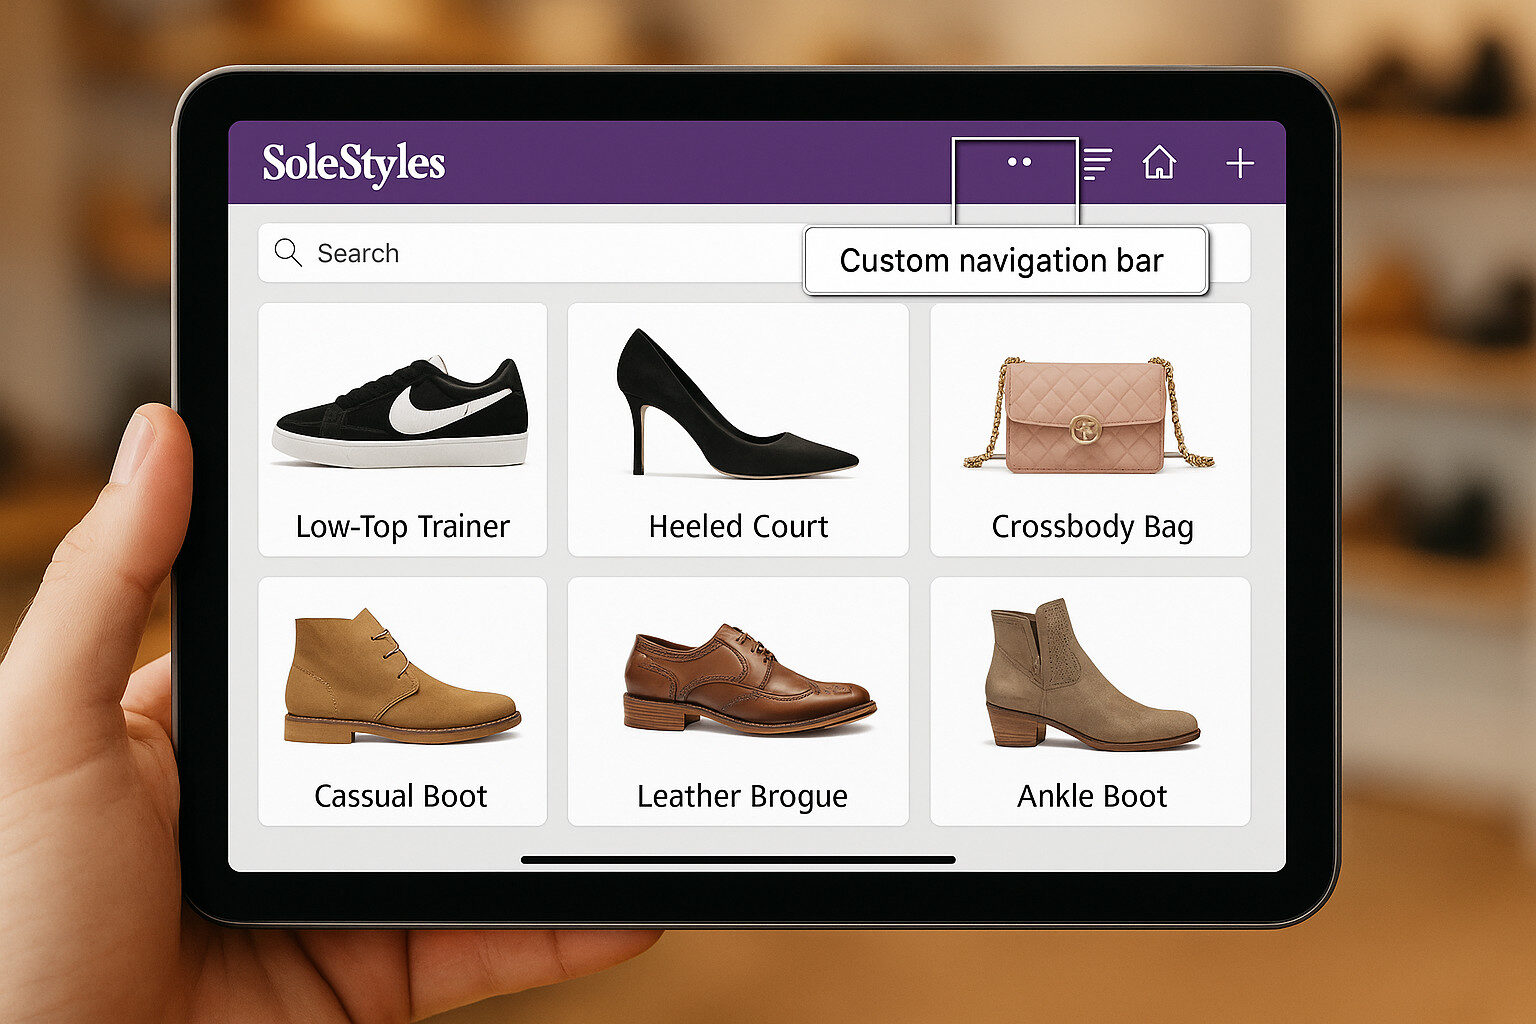 Home/Gallery Screen
Displays product thumbnails in a responsive grid that displays high-resolution product thumbnails or inspection records.
sits prominently at the top, filtering live as you type to avoid the delegation pitfalls of returning entire tables to the client.
The “Plus” icon in the header launches a staff-only form for creating special orders or recording pop-up stock counts, keeping employee actions separate from customer-facing processes.
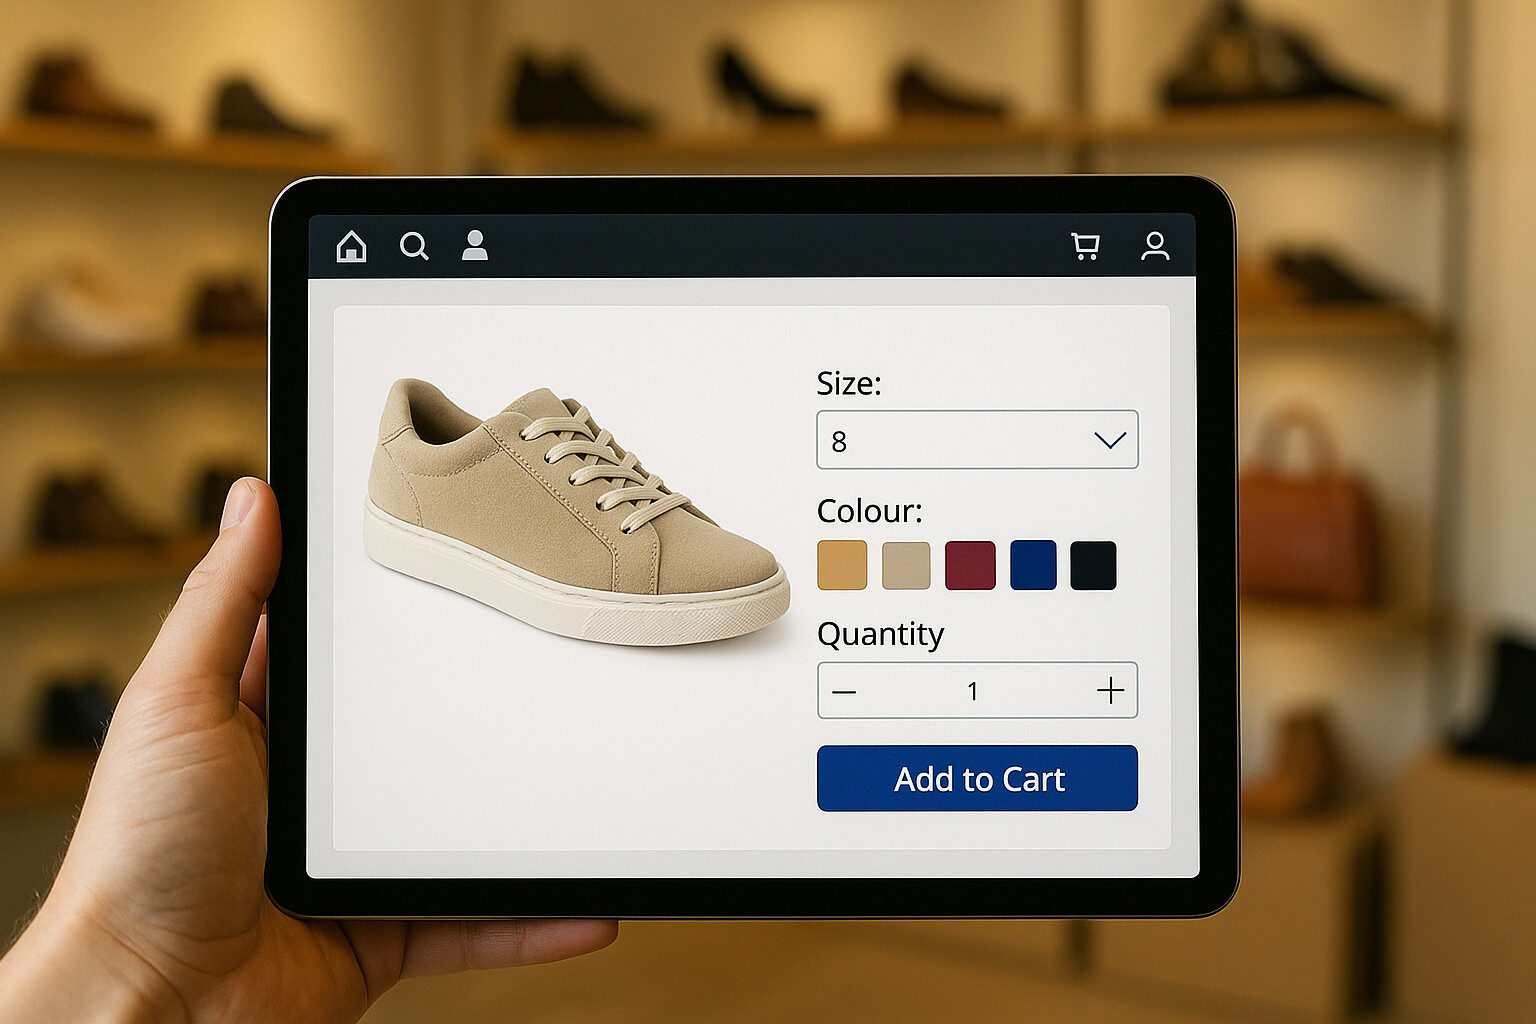 Detail Screen with Add to Cart
Collect(
colCart,
Patch(
Defaults(Cart),
{
ProductID: ThisItem.ProductID,
Size: drpSize.Selected.Value,
Colour: drpColour.Selected.Value,
Quantity: varQuantity
}
)
);
PowerAutomate.Run (
JSON (
{
CartItems: colCart,
UserID: varUserID,
ShippingMethod: drpShipping.Selected.Value,
Address: txtAddress.Text,
PaymentToken: ccControl.Token
}
)
);
If payment fails, show a retry/cancel popup.
By weaving these screens together with consistent, icon-driven navigation and carefully choreographed transitions, I ensured that Solestyles Canvas App feels as intuitive as any consumer-grade shopping experience yet is backed by the full power, security and flexibility of the Microsoft Power Platform.
 In a Canvas App that must handle thousands of product records, naïve local filtering will quickly bump into the default 500-record limit and degrade performance. At Solestyles, I embraced Power Apps’ delegation model to offload data processing to Dataverse, ensuring that search and filter operations return only the relevant subset of records, regardless of the table size.
Power Apps will delegate certain data operations to the server when the underlying data source supports it. Dataverse delegates functions like Filter, Sort, Search (when paired with StartsWith), and many comparison operators. Non-delegable calls, by contrast, run client-side against the first 500 records only, risking incomplete or inaccurate results.
The primary search box lets shop assistants type keywords; style names, SKU codes or designer collections; and immediately see matching products. I bound the search input to a variable:
// OnChange of txtSearch:Set(varSearch, Lower(txtSearch.Text))
Then, in the gallery’s Items property:
Filter( Products, Or( StartsWith(Lower(Name), varSearch), StartsWith(Lower(SKU), varSearch), StartsWith(Lower(Category), varSearch) ))
By using StartsWith, you remain fully delegable; by normalising both sides with Lower, you avoid case-sensitivity issues.
Beyond free-text search, users can narrow results by category or stock availability. I added a dropdown drpCategory and a toggle tglInStock, then wrapped them together:
Filter( Products, ( varSearch = "" || Or( StartsWith(Lower(Name), varSearch), StartsWith(Lower(SKU), varSearch) ) ) && (drpCategory.Selected.Value = "All" || Category = drpCategory.Selected.Value) && (!tglInStock.Value || InStock = true))
This single, server-side query handles all combinations, always returning the correct data.
Users often want to sort by price or release date. Since Sort is delegable, I chained it after the filters:
Sort( FilteredProducts, If(drpSort.Selected.Value = "Price", Price, ReleaseDate), If(btnSortDesc.Pressed, Descending, Ascending))
I leveraged App Checker and Performance Profiling tools to flag any non-delegable calls. For small, static lookup tables such as Categories, I preloaded them into collections on OnStart, eliminating delegation concerns for those controls altogether:
ClearCollect(colCategories, Categories);
By architecting search, filter and sort to run on the server, Solestyles Canvas App scales elegantly – from 500 products to 50,000 – while preserving sub-two-second response times and a seamless user experience.
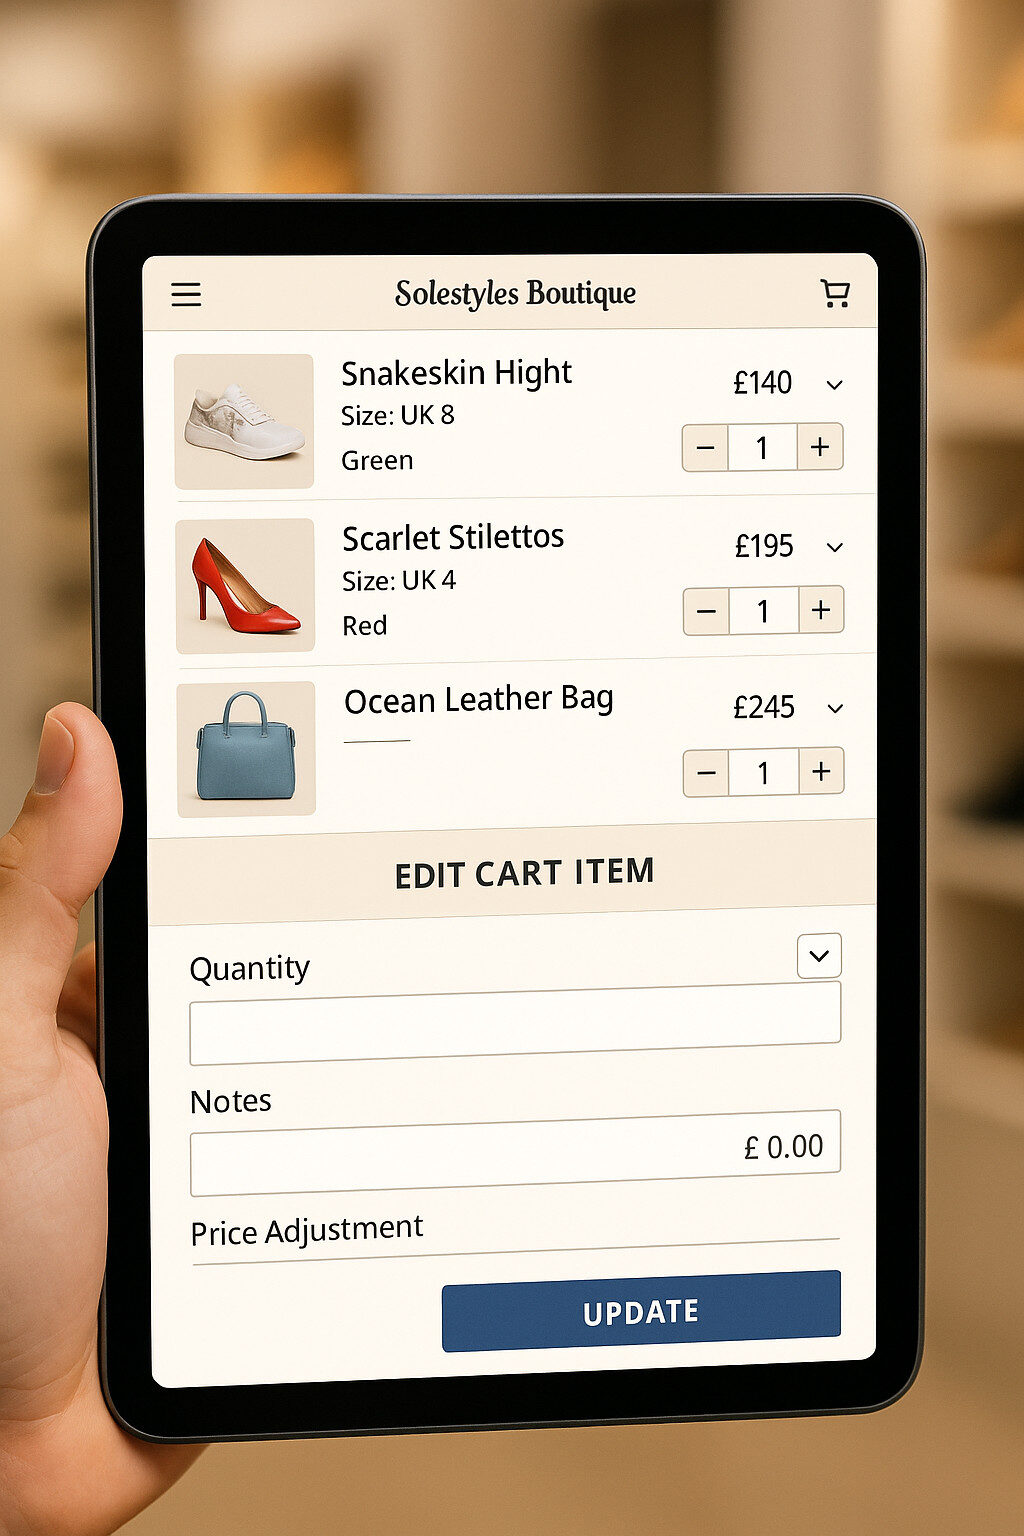 A truly robust Canvas App combines clean visual galleries with intuitive forms for data entry and editing. For Solestyles, I crafted a tightly integrated experience where users can select, view and modify records without ever straying from the familiar gallery form viewpoint.
Canvas Apps offer Form controls; DisplayForm and EditForm; that bind directly to Dataverse tables. For every record type (Products, Orders, CartItems), I created a dedicated form:
// On Success of frmCartItem:SubmitForm(frmCartItem);// Refresh the gallery to reflect changesRefresh(CartItems);
I placed each form on its own screen, with the Item property set to the selected record from the gallery:
frmCartItem.Item = galCart.Selected
Inside each Form control, DataCards represent individual fields. I configured them to enforce business rules:
Error messages appear inline by setting the DataCard’s ErrorMessage property, guiding users to correct input without cryptic pop-ups.
Long lists of products or orders benefit from compact thumbnail galleries. I optimised the Solestyles Boutique gallery by:
Selecting a gallery item triggers the OnSelect:
UpdateContext({varSelected: ThisItem});Navigate(scrCartItemForm, ScreenTransition.Fade)
For some use cases; like adjusting quantities in the cart; I embedded small input controls directly within gallery templates. A numeric spinner control inside each gallery item allows quick adjustments:
// OnChange of quantity spinner:Patch( CartItems, ThisItem, { Quantity: Self.Value });
Because Patch is delegable for single-record updates, these inline edits bypass the need for a full form and eliminate nonessential navigation.
When users work offline, all edits go into local collections (SaveData/LoadData). On reconnect, these local collections are reconciled:
If(Connection.Connected, ForAll(colCartChanges, Patch(CartItems, LookUp(CartItems, ID = CartID), { Quantity: NewQty })), Notify("You must be online to save changes", NotificationType.Error));
This approach ensures that whether on the shop floor or at a remote pop-up, data remains accurate and user edits aren’t lost.
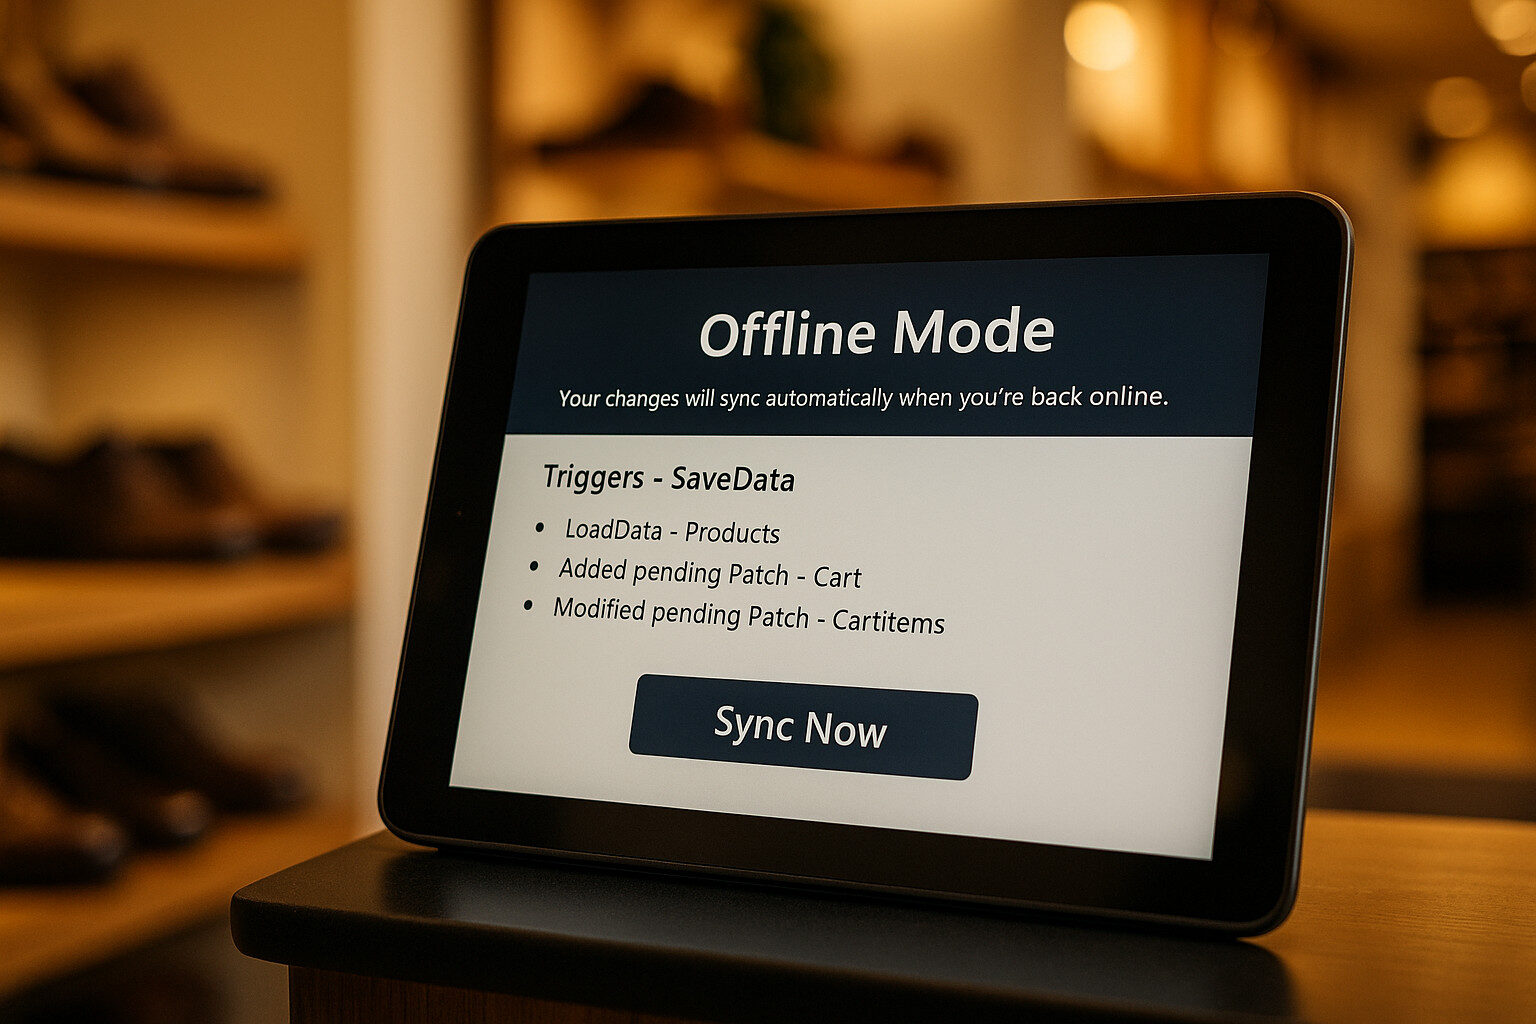 In retail, connectivity can vanish in an instant; whether you’re in the boutique’s back office when the Wi-Fi cuts out, or at a weekend pop-up stall where mobile signal is spotty at best.
Offline-First isn’t an optional feature; it’s a cornerstone of reliability and user confidence. Imagine a customer waiting patiently for a new delivery time during a sudden network outage, or a manager updating special orders in a car park without internet. The Solestyles Canvas App needed to ensure that no sale stalls and no stock check slips through the cracks, regardless of connectivity.
From the moment the app launches, the latest data is loaded into local collections. On App.OnStart, the logic looks like this:
If( Connection.Connected, ClearCollect(colProducts, Products), LoadData(colProducts, "ProductsCache", false));
Rather than attempt immediate writes to Dataverse (which would fail offline), I queued edits in a colPendingChanges collection. Each user action – changing a cart quantity, updating an address records:
Collect( colPendingChanges, { Table: "CartItems", RecordID: galCart.Selected.ID, Updates: { Quantity: varNewQty } });
This approach guarantees that every change is captured locally, even if the network drops mid-edit.
When the device regains connectivity, an OnVisible or Sync Now button initiates reconciliation:
If( Connection.Connected, ForAll( colPendingChanges, Patch( Table(Updates.Table), LookUp(Table(Updates.Table), ID = Updates.RecordID), Updates.Updates ) ); Clear(colPendingChanges); SaveData(colProducts, "ProductsCache"))
Occasionally, two users might edit the same record offline. To prevent blind overwrites, I compare ModifiedOn timestamps:
With( { serverRec: LookUp(CartItems, ID = recID) }, If( serverRec.ModifiedOn > recClient.ModifiedOn, Notify("Someone else updated this record; please review.", NotificationType.Warning), Patch(...) ))
I present a lightweight dialog offering to Keep My Change, Use Server Value, or Merge Manually, ensuring data integrity and user control.
A persistent banner informs users of their connection state:
Offline Mode – Your changes will sync automatically when you’re back online.
For more urgent needs, a Sync Now button allows immediate retries, with clear notifications for success or any errors. By treating offline as a first-class scenario; caching data, queuing edits and guiding users through syncs; I deliver a seamless experience that keeps Solestyles running smoothly, no matter where the day takes them.
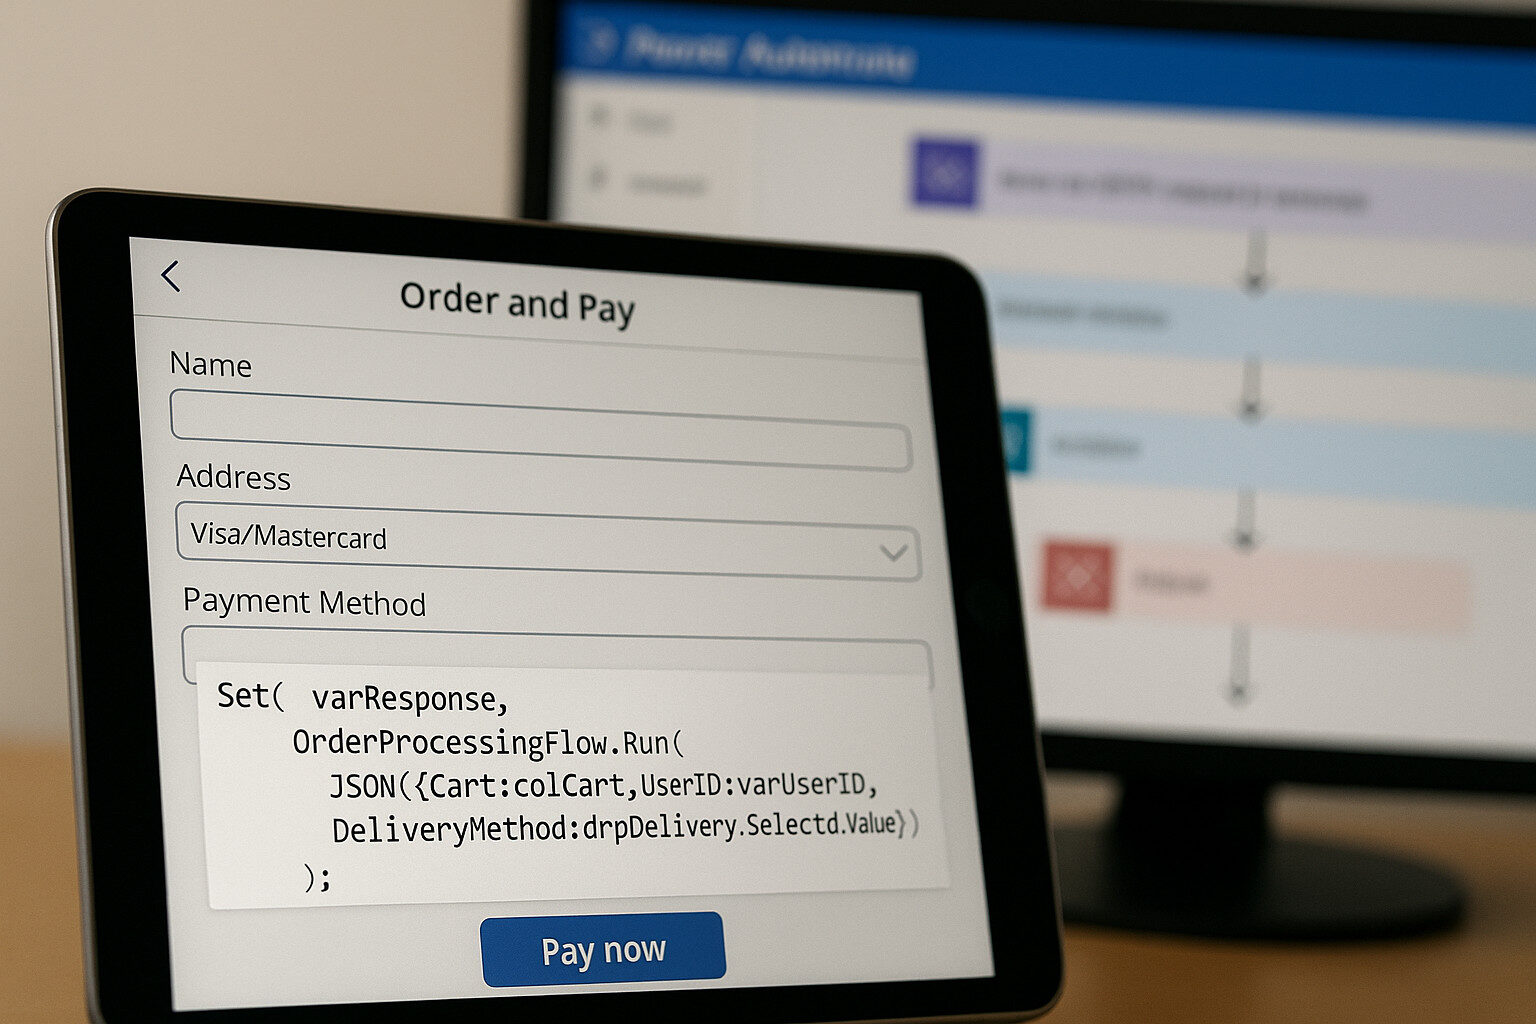 Canvas Apps shine at the user interface, but it’s Power Automate flows that handle the heavy lifting; processing payments, updating inventory, sending notifications and more. In this section, you’ll see how the Solestyles’ Canvas App invokes these flows and manages their responses, while reserving a deeper exploration for Post 4.
Every critical action in the app triggers a corresponding flow. For example, when a customer taps Pay Now, I package the cart and user details into a JSON payload and call the OrderProcessingFlow:
// OnSelect of Pay Now buttonSet( varResponse, OrderProcessingFlow.Run( JSON( { CartItems: colCart, UserID: varUserID, DeliveryMethod: drpDelivery.Selected.Value, Address: If(drpDelivery.Selected.Value = "Delivery", txtAddress.Text, "") } ) ));
// Provide immediate user feedbackIf( varResponse.Status = "Success", Notify("Payment successful! Your order is processing.", NotificationType.Success), Notify("Payment failed. Please try again.", NotificationType.Error));
By capturing the flow’s response in varResponse, the app can display a succinct success or error notification, complete with retry logic if needed.
Each flow is packaged in the solution, uses environment variables for connection references, and groups actions into Scope blocks with Configure run-after rules for retries and fallbacks (e.g. run after Failure to send an admin alert).
If( varResponse.StatusCode <> 200, Notify( "There was a problem processing your order. Tap Retry to try again.", NotificationType.Error, { ButtonText: "Retry", OnSelect: RestartFlow } ));
By tightly coupling Canvas triggers with resilient, solution-aware flows, Solestyles achieves a seamless, end-to-end process; from the moment a customer taps Pay Now to the final email confirmation, every step is automated and transparent. In Post 4, I’ll dissect these flows in detail; building, testing and troubleshooting each component.
 This image shows Solestyles Canvas App on a tablet in the foreground with a loading spinner indicating an active operation and a blurred monitor in the background displaying a performance profiler graph. It symbolises the commitment to both UI polish and measurable performance.
A powerful app only earns user loyalty when it feels polished, responsive and on-brand. For Solestyles, I invested equally in aesthetics and under-the-hood optimisations to deliver a Canvas App that delights at every tap. This is important to understand; UI/UX polish is far more complex, but appealing for the majority of Microsoft 365 applications, after all yes you can still have a “boring” Out-of-the-Box boring UI and UX, but is it going to entice your end users to want to use it? Like everything, UX and UI polish, refinement and development takes additonal time, head-scratching, but happiness in making your clients go “WOW”.
Rather than hard-code colours and fonts, I adopted the Fluent Design System’s theme variables:
{ "primaryColor": "#2C2A29", "secondaryColor": "#D4A373", "textColor": "#333333", "accentColor": "#F4E1D2"}
With tablets in landscape and portrait, screens auto-adapt using relative formulas:
// For a gallery control:Gallery1.Width = Parent.Width * 0.9;Gallery1.TemplateSize = If(Parent.Width > Parent.Height, 120, 80);
(HeaderNav.Visible = Parent.Width > 600)
Long OnStart sequences can stall user access. I parallelised data loads:
Concurrent( ClearCollect(colProducts, Products), ClearCollect(colCategories, Categories), ClearCollect(colCart, CartItems));
No one likes staring at a frozen screen so I layered in:
Set(varIsLoading, true);// data call...Set(varIsLoading, false);
Canvas Apps can be accessible too:
I integrated Azure Application Insights to offer Monitoring and Telemetry result analysis:
// OnVisible of each screen:Telemetry.TrackPageView("GalleryScreen");
 As I draw the curtain on my deep dive (apologies for the length, but it is necessary) into Solestyles Boutique’s Canvas App, it’s worth pausing to reflect on how far the solution has come. What began as a simple idea to replace paper invoices and scattered spreadsheets with a mobile-first interface has blossomed into a resilient, feature-rich application. From offline caching and multi-field delegable search to seamless integration with Power Automate, every layer of the app showcases best practices in low-code design.
With the Canvas App serving as the frontline interface, the next logical step is to explore how Solestyles managers and back-office staff interact with the same data through a Model-Driven App. In Part 3, I’ll:
Stay tuned for Part 3: Unlocking Model-Driven Apps for Solestyles Boutique, where I’ll continue the journey into a truly end-to-end Power Platform solution.
Thank you for following along. If you have questions about any Canvas patterns I have covered; whether delegation nuances, offline caching intricacies or flow-invocation syntax; drop a comment or fill in the contact me form. I look forward to diving into the next part with you.